Restoration Case Study: Porsche 1978 911 SC
Back in the driver’s seat
My company, Tech 9 Motorsport has been actively involved in Motorsport since 1993. We’ve concerned ourselves solely with circuit racing, usually with Porsche (although we have dabbled with other makes over the years). When the economy took a turn for the worse, we decided to call a halt to the circuit racing, so we could concentrate on our core business – tuning, modifying and servicing Porsches at our workshops in Liverpool.
Personally, I stopped racing at a competitive level in 2005 to concentrate on running what would become a rather large race team. We would often run four cars at an FIAGT meeting and the staff and logistics involved were quite something! Since the race team is no longer operating this feels like the perfect opportunity for me to get back behind the wheel. After all, the roots of Tech 9 had their foundation in my racing activities and I had the chance to return.
As anybody who has been involved in Motorsport will tell you, you can’t just rock up in any old motor. I had to think long and hard about what I wanted to drive, what I wanted to enter, and what I would have to prepare as a result.
Choosing a lane
I knew that I wanted to build a car and I considered all forms of the 964 or 993, but there was no suitable championship that I felt particularly compelled to enter. My mind turned to ‘historic’ events, pondering for the briefest of moments over a ’74 3.0 RS, or even a 2.0 ’65 car. At the end of the day, the thought of being mid-field in events or even a class winner did not appeal to me. Instead, I turned my attention to historic tarmac rallying.
This is a discipline where a Porsche has the opportunity to win outright – at least if it’s driven well by the right driver. More than that, it’s the perfect environment in which to showcase the technical skill and expertise of Tech 9 as we build a ‘new’ historic 911. The car itself will also act as a calling card for the company, demonstrating the range of products and services that can offer our clients – specifically some of the ‘period remanufactured’ parts that will be used in the build.
The dream car
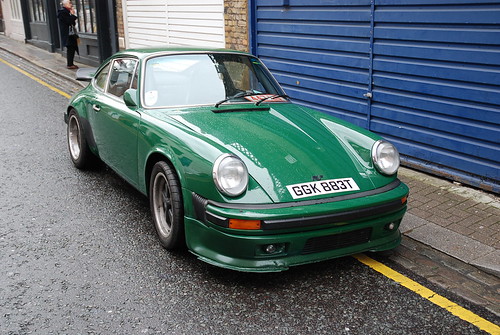
Once I knew what race I would be entering, it was so much easier to zero in on a suitable car and specification. I already had an idea of what the mechanical specs were going to be for my build and they included a 3.0 MFI engine at the heart. After some soul-searching, I settled on the 3062 homologation pre ’81 911 SC to power the beast… Now all I needed was the car!
I already knew it had to be an SC and that I wanted left-hand drive. Beyond that, I wasn’t too concerned about the car’s mechanical state, so long as it had a good standard chassis with very little rust. It took a couple of months’ worth of sharing before the ideal donor presented itself in an online classified ad on the Impact Bumpers website.
I was perfect! A 1978 911 SC, which had been converted to SCR specification in the eighties by RUF. I did feel a little guilty about stripping a car like this – one that was relatively rare – when maybe I should have been restoring it. A quick inspection of the car itself chased those worries away. To say it had seen better days would be an understatement. The engine had suffered serious cylinder leakage, the gearbox needed a full rebuild, the bodywork had been badly painted throughout its life and was pitted with rust and corrosion. All in all, not a great candidate for a restoration project.
On the other hand, the chassis looked fine and I was sure I could incorporate some period parts into the build. Satisfied that I could honour the previous vehicle better by making the physical core of my new build, the decision was made…
…time to get stripping!
Porsche Shell Restoration
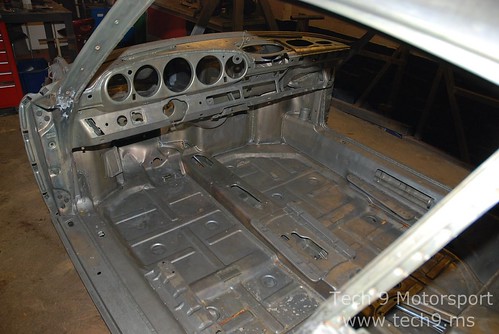
Dismantling
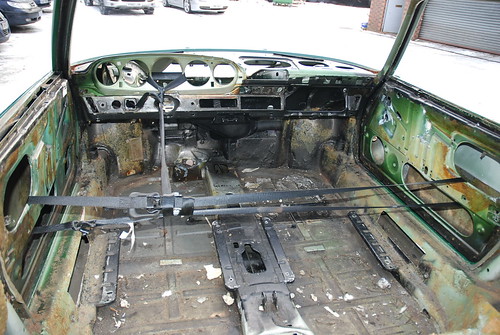
It took a few days in the Tech 9 workshop to fully dismantle the car. It was obvious as we began stripping it that it had undergone several body repairs over the years. That’s hardly surprising for a car that’s over 30 years old. Overall, the chassis looked to be in good condition. The fact that the vehicle was made after 1976 means it will have been galvanised at the factory to prevent rust, but I am quite sure the amount of oil leaking from the engine and gearbox played its part in that too! With the car now dismantled, we can send it off to be acid dipped, which will show us just how much work it’s had done.
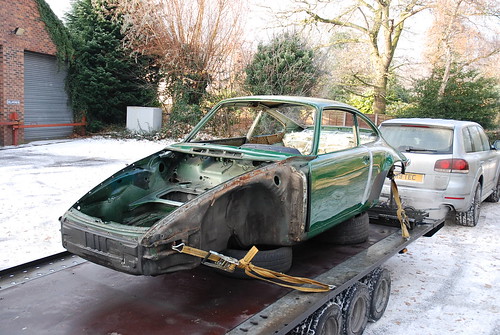
Acid Dipping Process
Acid dipping is an incredible process as it shows up any flaws in a car’s bodywork. You might think you can hide stuff with a bit of filler and a liberally applied paint job, but acid dipping will tear those assumptions apart… along with everything else, as it happens. In this case, it was pretty much what I expected. There was some corrosion to the top and bottom of the door lock posts and the left rear quarter had not only seen some damage, but also some fairly ropey repairs.
But not to worry – she’s still a perfectly serviceable chassis that we can strengthen and modify but first…
Servicing
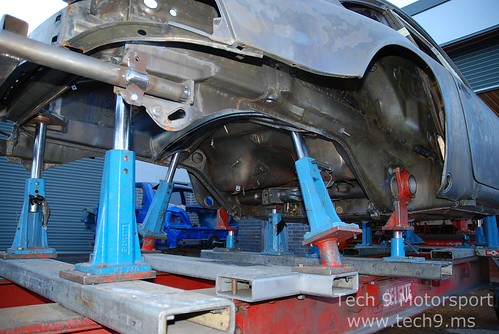
When rebuilding using a vintage car, it is essential that you make sure the factory dimensions of the chassis have not been affected by 33 years of service. Even the slightest variances on the suspension mounting points can mean any work we carry on from this point will be wasted. To confirm that the chassis was the same dimensions as it was when it rolled out of the factory gates all those years ago, we serviced it by placing it onto a Celette chassis jig and held our breath. Fortunately it sat perfectly, showing no deviation in any of the points.
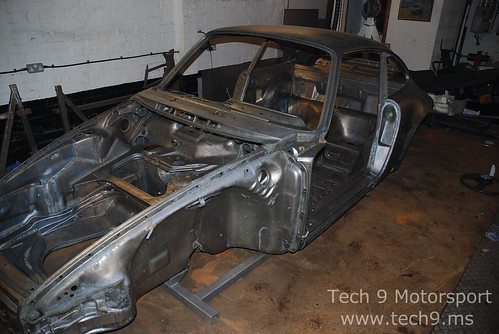
Beyond establishing the factory dimension, the chassis jig also came in useful as a stable platform for the strengthening process and other modifications we needed to make for it to be Motorsport ready. Before proceeding with this next step, we welded all the seams to improve the structural strength and torsional rigidity of the chassis. Thanks to the acid dip, we had the perfect surface to allow for correct weld penetration.

Modifications
Cage Installation
When you’re planning on entering your car in a historic tarmac race, you need to make sure you’re going to be safe while driving it. To this end, we fitted a sturdy roll cage to protect the car in the event of a side-on collision.
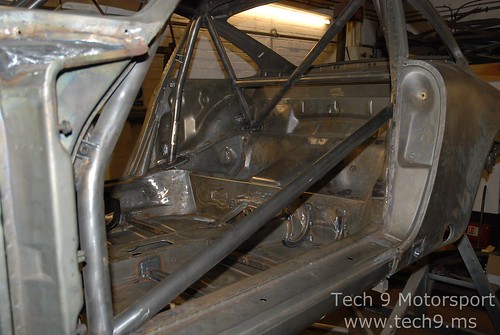
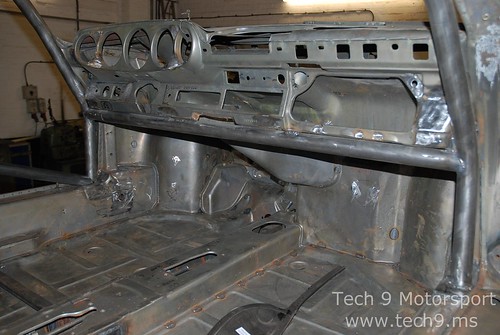
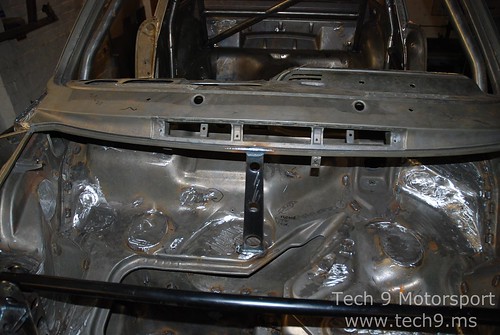
Scuttle Area
Of all the modifications, the scuttle area proved the most time-consuming. Since we are planning to use a bespoke wiring system, there was no need for the standard holes in the bulkhead area that housed the heating system and loom routing. We also fabricated our own scuttle brace to replace the existing bolt-in version. This was an important safety consideration, as our new brace is fully-welded to offer greater rigidity, since this part of the car can flex.
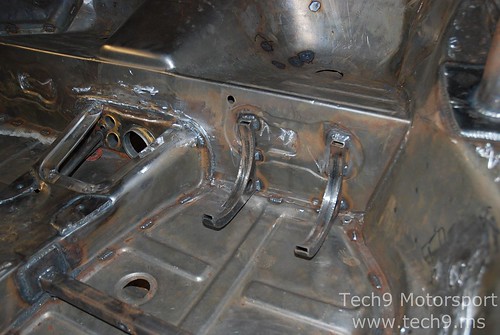
Mounting Brackets
I needed the car to accept a pair of Recaro race seats, which meant welding the mountings as low as possible into the chassis. The seat-side mount brackets could then bolt directly onto the seat mounting rails, giving it a good, rigid mount. As a driver, this is essential, as it gives you more of a feeling of what the car is up to on the track than if your seat mount has more flex to it.
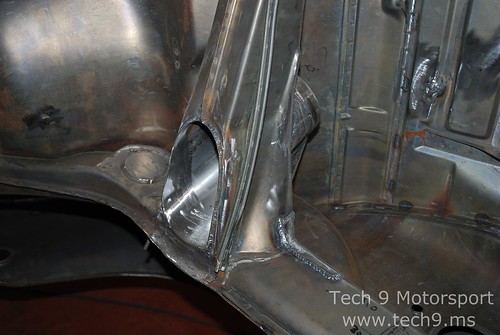
Rear Suspension Turrets
The rear suspension turrets also needed to be modified. The plan was to fit a coil spring to the rear damper, which will increase the diameter of the rear damper. The turrets needed to be modified to accommodate this and provide sufficient clearance. We also strengthened the upper area, since the new suspension layout will increase the loadings on this part of the chassis. The complete turret housing was grafted to the rear chassis beam so the modified turrets would still have the same period style of the RSR.
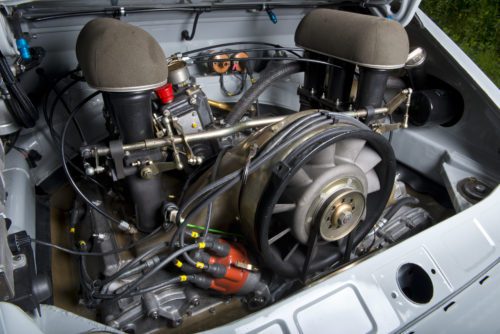
Engine and Gearbox Build and Installation
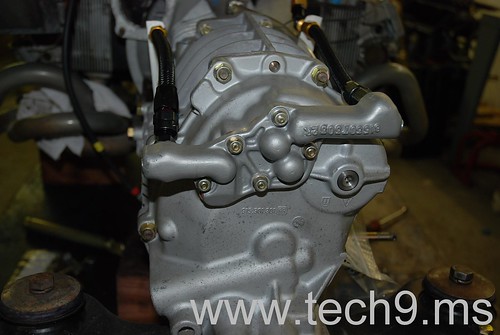
When we stripped the gearbox, not only did we find the typical wear you’d expect of synchros, but the main bearings were loose and shuffling in the final drive housing. While this isn’t exactly uncommon for a 915 gearbox, it’s simply not good enough for the racetrack and the punishment it’s likely to incur out there.
Fortunately, WEVO in the US has a neat solution for this problem. It involves inserting a machined steel plate into the casing and changing the specification of the input shaft bearing to the turbo specification to enhance durability. Since that’s exactly what we’re looking for, we shipped it over to them.
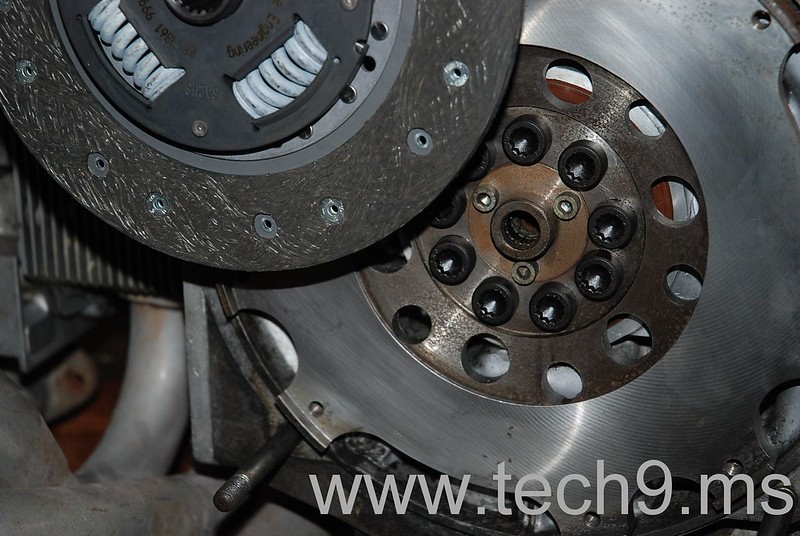
Once it returned, we were able to install the engine, gearbox, and clutch into the car. We wanted to keep things as light as possible to maximise performance on the track. To this end, we fitted the engine with a lightweight flywheel that came in at 55% of the industry-standard weight for these components (2475g vs 4464g, if you’re interested). We also installed a Sachs power clutch for optimal performance.
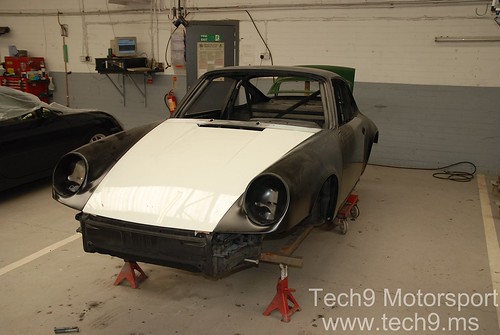
Shell and Paintwork
Of course, some of these tasks were taking place concurrently. While we were rebuilding the gearbox in the States, we were busy attending to the car’s shell here in Liverpool. Once the chassis modifications were complete, we needed to re-treat the shell. It had been a few weeks between the initial acid dip and us finishing our fabrication work – long enough for minor levels of surface corrosion to form. The chassis receives a quick re-dip, which not only removes any oxidation from the surface, it also prepares it for the e-coat. Acid dipping etches miniscule scratches on the surface of any metal, invisible to the naked eye. These scratches do not damage the shell, but provide an ideal surface for paint to adhere to the metal.
When we received the chassis back, there were a few areas that the e-coat process had missed, likely due to air pockets forming as the shell is dipped. This is not uncommon and easily resolved. In fact, we covered those areas immediately, using epoxy two-pack primer for added protection.
Following the e-coat, we needed to finalise some of the detail work before going ahead with the final paint job. Since the goal was a car as lightweight as the homologation regulations would allow, having big lumps of filler in the panels simply wasn’t an option. Instead, we fitted a new pair of rear quarters, which also gave us a chance to work on the kidney bowl area, improving the strength and rigidity by replacing the inner and outer sills.
The doors faced the same problem with the amount of filler they would need to repair, so we bit the bullet and fitted new door skins instead. Since the rest of the outer panels had been replaced, we saw no reason to stop at the front wings. These had corroded somewhat below the headlamp bowls, so fitting a new pair made perfect sense.
The last bit of bodywork, prior to painting, took a while to get right. This was the front lower valance and its central oil cooler. The front slam panel lies tight behind the cooler, severely reducing its efficiency. RSR models overcame this problem by building a duct into the front panel so the air would pass through the cooler, exiting at the floor. I have to pay care and attention to recreate the ‘period’ RSR look I was going for, while still ensuring optimal efficiency.
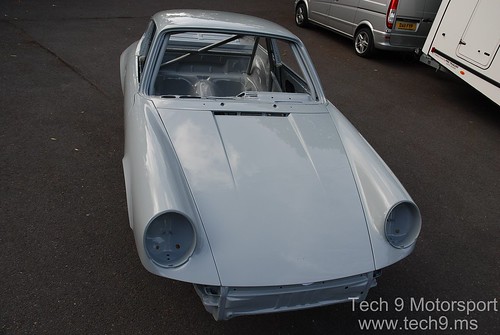
With the bodywork complete, the final paint job was easy. The e-coat served as an excellent primer, allowing for the paint to be applied evenly across the shell. We finished the aesthetics with a green-tinted windscreen and vehicle glass to give the vehicle a nice period look.
Bumper Installation
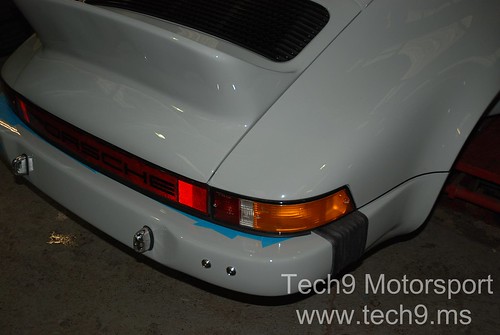
To keep the car as light as possible (an ongoing theme with this project) I stripped all the rubber trims from both the front and rear bumpers. Where the rubber strip normally sits, we fabricated an aluminium panel. We also relocated the indicator further back towards the bellows. This was updated after the build was completed, as I preferred the look of the rubber parts !
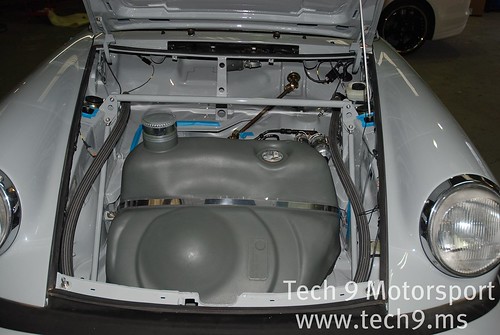
Plumbing
As with any car, there was a fair bit of plumbing to take care of, including oil lines, fuel and brake lines, and a hydraulic handbrake. For safety purposes, we channelled the oil lines through the car, rather than along the sills. While that would be fine for leisure driving, in a racing environment can be exposed to damage.
Speaking of safety, we also mounted a fire extinguisher, in case of an emergency. We assumed we would need a 4-litre bottle, as per FIA regulations, and fitted a large mount to accommodate it. It turns out that Lifeline produces a compact fire extinguisher bottle that is not only FIA-approved but also – you guessed it – much lighter!
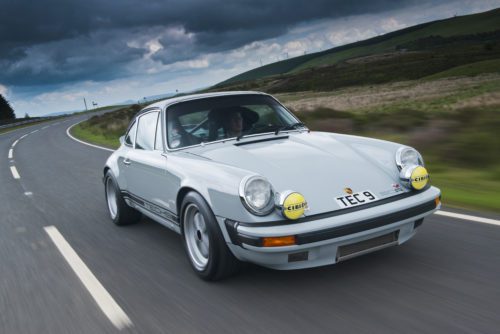
Winning Porsche Restorations
As a follow on from the build diary, the car was entered in various Competition events, with Multiple outright Wins – A testament to the quality of the build and the Team at Tech 9 Motorsport for such a special build.
Do you have a similar restoration project in mind for your Porsche? At Tech-9, we are Porsche restoration specialists and love to work on new and exciting projects with our clients. If you are interested, get in touch with us by filling in a contact form or giving us a call on 0151 4255 911.